An autumn–winter nail art palette can support several salon services, from a soft caramel gradient to a berry accent with painted detail. For a brand or distributor, the buying decision involves the designs customers will choose, the materials they need to create them and the cost of introducing the collection alongside the products already in stock.
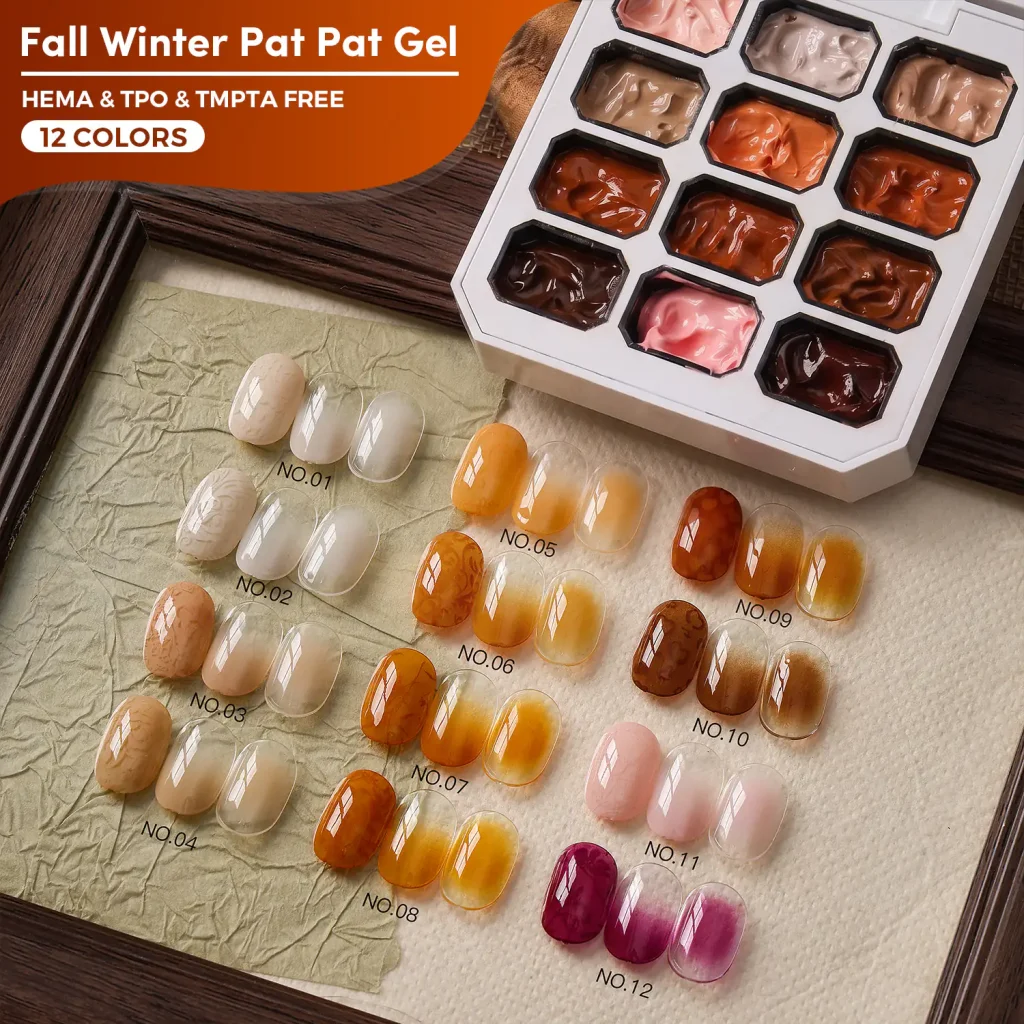
JTING Fall Winter Pat Pat Gel (G78) brings 12 autumn–winter shades into a soft solid gel palette, with 3 g per pan. It supports sponge ombre and blush effects, hand-painted details, nail stamping, color mixing and chrome powder base work. UV lamp curing is required; the cured surface has a no-wipe finish. The formula is HEMA-free, TPO-free and TMPTA-free, and application tools are not included with the gel palette.
This guide explains how to choose applications for your salon customers, compare the palette with your existing range and evaluate samples before a bulk order. It also covers service and resale costs, customer demonstrations, branded packaging and replenishment, so the collection can be planned from first sample to repeat order.
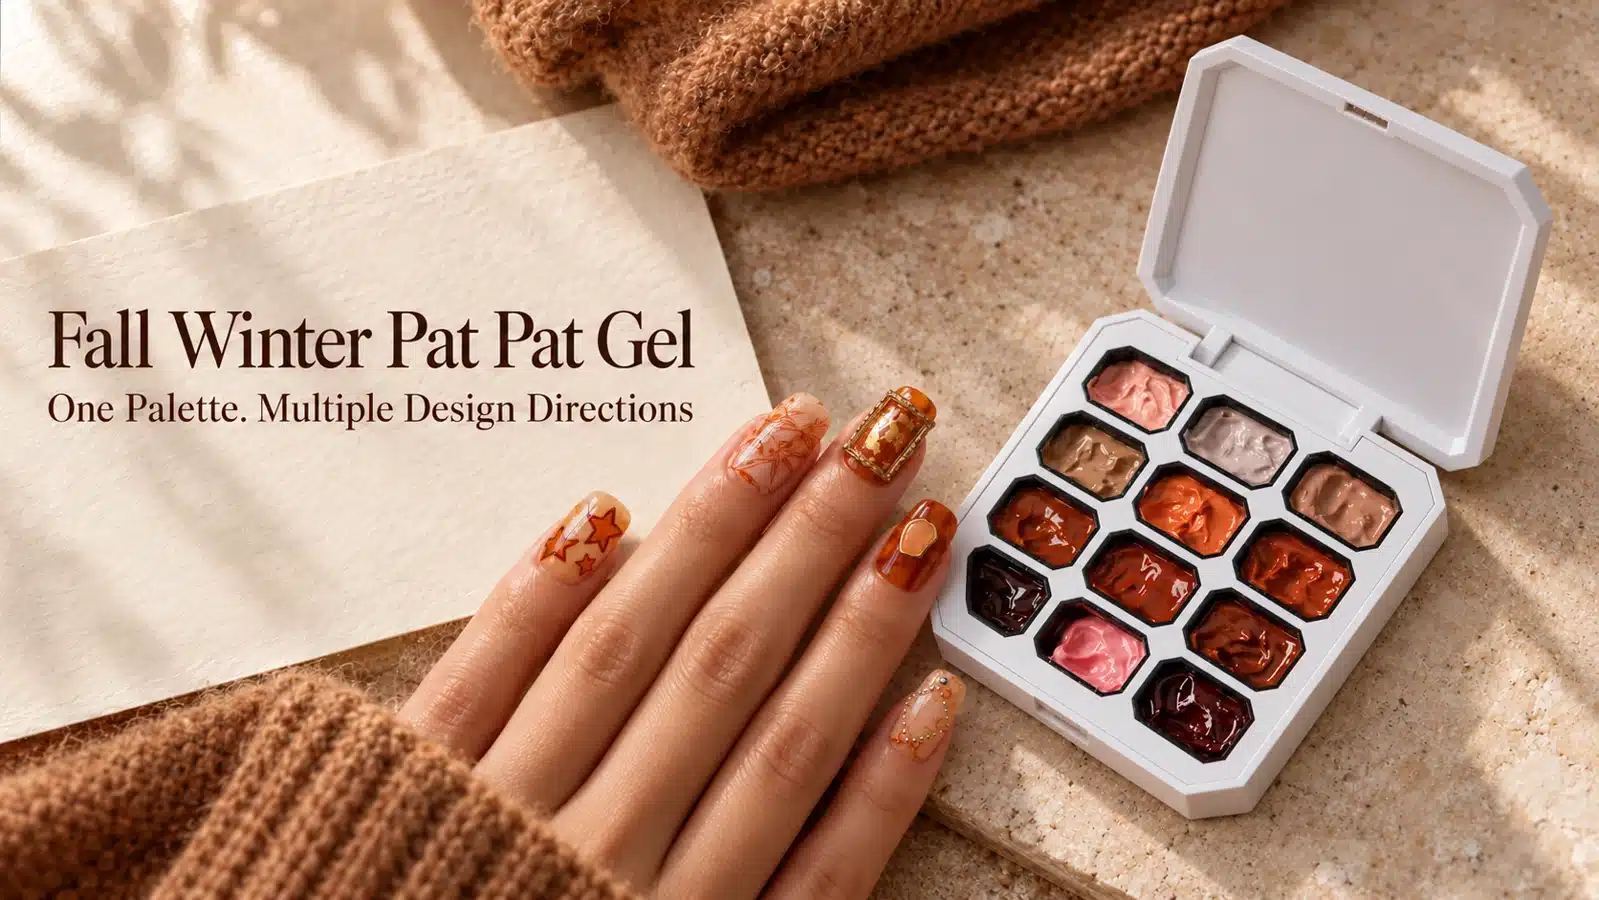
Plan seasonal nail designs around the palette, from soft gradients to amber details.
1. Decide What Fall Winter Pat Pat Gel Adds to Your Existing Range
A seasonal palette earns its place when it gives your customers a useful color selection, application method or design choice that your existing range does not cover well. Start with what salons already buy from you and the designs they want to offer. Similar colors do not automatically mean duplicate products: a shade used for full coverage may serve a different purpose when applied as a soft blush or a small painted detail.
Scroll horizontally if needed to view all columns.
| Your Existing Range | Possible Gap | What to Compare in the Sample |
|---|---|---|
| Autumn gel nail polish colors | Soft transitions and localized blush effects | Whether sponge application adds designs your customers want |
| Individual nail art gels | A coordinated seasonal selection in one palette | Whether the colors work together in complete sample sets |
| An existing pat pat gel range | A different seasonal color direction or handling preference | Color overlap, pickup and the finished effects side by side |
Give the sample review a specific question: can customers create a useful neutral gradient, build a warm seasonal set, or combine painted and stamped details? Compare those results with your current products under the same conditions.
Start with a few salon designs that address the gap in your range. Use them to decide how the palette will appear in your catalogue, which applications to demonstrate and which existing base, finishing and nail art products to recommend alongside it.
2. Understand the Soft Solid Texture and Controlled Color Placement
Fall Winter Pat Pat Gel has a soft, creamy solid texture. The paste stays in the pan for controlled pickup and placement rather than behaving like a freely flowing liquid. For the technician, the practical questions are how much gel reaches the tool, where it first touches the nail and how far that color is spread.
Match the Texture to the Technique
For a gradient, look at how evenly the sponge distributes a small pickup and how easily the edge can be softened. For painted details, assess line placement with the selected brush. This gives buyers a practical way to compare the solid format with the materials their salon customers already use.
Show pickup and edge control when introducing the palette to technicians who usually work with brush-applied gel nail polish. Use thin, controlled application to build the intended color; the detailed sponge method follows below.
3. Read Each Shade as Full Color, a Gradient and a Pattern
The shade chart presents each numbered color through patterned, full-color and gradient samples. These show different uses of the same 12 colors, No.01–No.12. A softer-looking gradient is another way to use that numbered shade.
Give Each Color a Role in the Design
No.01–No.04 form the light neutral group: cream, beige and muted nude tones offer quieter color areas, soft transitions and contrast around darker details. Review them over the base colors your salons actually use, especially when the intended effect leaves part of that base visible.
No.05–No.10 move through warm golden, orange-brown, amber, caramel and deeper brown directions. They offer options for a warm gradient, a stronger focal area or darker pattern work. No.11–No.12 bring pink and berry directions into blush nail art and coordinated accents. These descriptions help buyers navigate the palette; the numbered references remain the basis for selecting colors.
When a customer selects a sample, record both the color number and the effect. “No.12 as a diffused center” is more useful than “the berry design.” Keep that connection across sample tips, catalogue images and sales notes. Approve color with the physical sample, since lighting, screen settings, the underlying base and application amount can change its appearance.
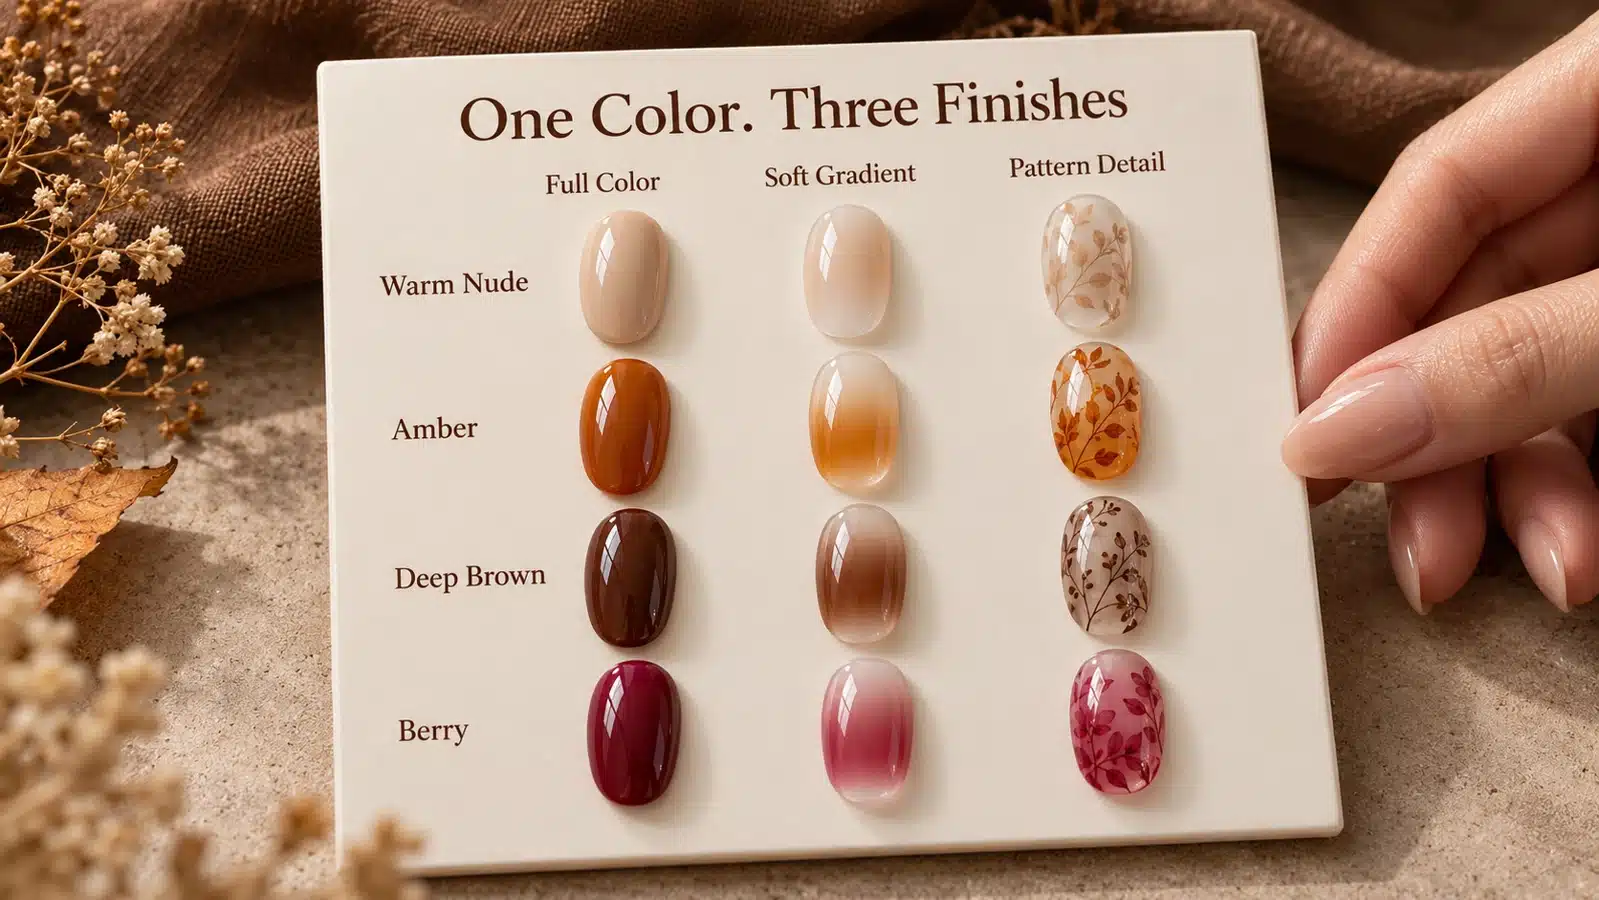
Compare full color, soft gradients and patterned accents across four seasonal color directions. Select the numbered shades using physical samples.
4. Check the Tools and Materials Your Customers Need
The palette contains the gel colors; application tools are not included. Before promoting a finished design, check whether your customers already have the items needed to reproduce it. A useful demonstration starts with a complete, workable combination of gel, tools, base products and finishing materials.
Scroll horizontally if needed to view all columns.
| Planned Effect | Check or Prepare Separately | Confirm on a Sample |
|---|---|---|
| Sponge ombre or blush | Suitable sponge supplies and the intended nail base | Pickup, edge softness and the appearance over that base |
| Hand-painted details | A detail brush suited to the planned shapes | Line control and the amount held by the brush |
| Nail stamping | Stamping plate, stamper, scraper and related supplies | Complete pickup and transfer with the selected combination |
| Chrome accents | The chosen powder and its required finishing products | The result over the selected gel color and after finishing |
Tool readiness helps determine which effect to introduce first. For salons already equipped for sponge ombre, a gradient can be a practical starting point. Stamping and chrome designs bring their own material and demonstration needs, so match the first promoted look to the equipment and experience of the customers you supply.
Give customers a preparation list for that specific look, covering the palette, separately sourced tools, base and finishing products, and UV curing instructions. This helps the buyer understand the complete setup before adding the product to a salon order.
5. How to Use Pat Pat Gel for Ombre and Blush Nails
For ombre gel nails, plan the area of strongest color and leave enough space for the fade. Decide where those areas belong before loading the sponge. Use a prepared sample tip with the base and application sequence appropriate to the products involved.
- Start with a small pickup. Check the first impression on a separate practice surface. Look for an amount you can distribute without leaving a raised patch.
- Place the first contact deliberately. Begin in the area intended to carry the strongest color, rather than at the outer edge of the fade.
- Develop the transition. Use light, controlled contact to extend the color outward. Observe how pressure and the remaining gel on the sponge affect the edge before collecting more.
- Review the shape. Compare the center, transition and surrounding base, then cure and finish according to the product instructions. Use the completed result to choose one variable for the next practice sample.
Change the Placement for Each Effect
For a tip gradient, concentrate the design toward the free edge and plan the transition back across the nail. For a blush effect, choose a localized center and soften its perimeter. The two designs require different placement even when they use the same shade and sponge.
For a two-color transition, first decide where each color should remain recognizable and where they should meet. Keep the sponge contact areas clean enough to distinguish intentional blending from unwanted color carryover. Compare the resulting transition with a single-color sample before adding decorative details. In demonstrations, show how the technician judges color depth and edge softness before moving to the next step.
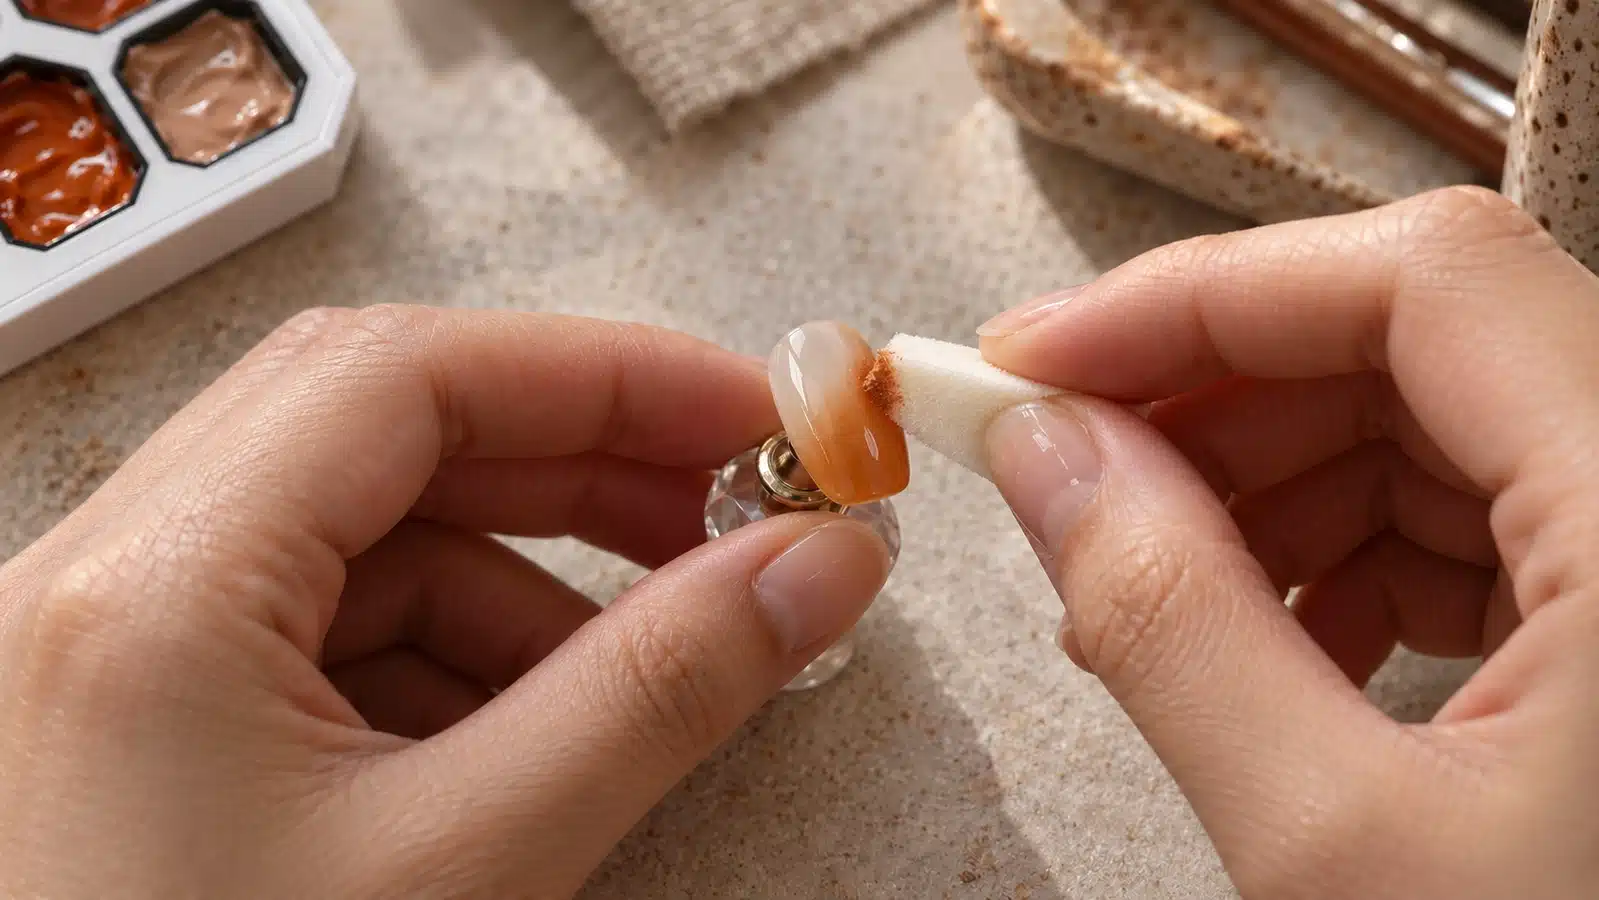
The brown corner of a small sponge touches the caramel gradient while the nail tip is held steady on a display stand.
6. Build Color Coverage and Mix Coordinated Shades
The same pat pat gel can produce a light haze or a more concentrated color area. Thin application allows the technician to develop the intended effect while assessing coverage over the chosen base. For customer demonstrations, show the finished gradient and fuller-color sample side by side so the difference is easy to see.
Compare Coverage against a Defined Target
Decide whether the sample should retain a visible base, show a soft transition or present a fuller color field. Those are different targets. A translucent-looking blush may already match the design even though it would not pass as a full-color sample. Keep the approved effect beside the practice tip so technicians assess the same outcome.
Record Mixtures Separately from Standard Shades
For a coordinated accent, try selected colors from the palette on a separate mixing surface. Record the original shade numbers and the relative amounts used, then make a cured and finished reference following the product instructions. Compare the mixture with the unmixed colors before deciding whether it adds anything useful to the set.
Keep the original pans unmixed and label the blended sample with its shade numbers and proportions. That gives the salon team a recipe to repeat while preserving the standard colors for other designs. Include the base and finishing products in the sample notes.
7. Choose Hand Painting or Stamping
Choose the technique around the motif and your team's experience. The palette can be used as a nail art painting gel or for nail stamping, and each method offers a different way to control the design.
Use Hand Painting for Adjustable Shapes
Hand painting lets the technician change the length of a line, the direction of a leaf or the amount of open space around an accent. It is a useful approach when the design needs to fit a particular nail shape or connect with a gradient underneath. On the sample, assess line width, the ends of strokes and any buildup where strokes meet.
Use Stamping for a Selected Plate Pattern
Stamping begins with the pattern available on the plate. Look for complete pickup, clear detail and accurate placement on the sample. For a coordinated set, also check whether the motif fits the nail shapes and sizes your customers offer.
For a warm seasonal set, try a small leaf motif or contrasting lines over a neutral or amber base. When both techniques suit the design, compare completion time, corrections and consistency across several sample tips. Choose the method your team can demonstrate with the tools it plans to use or recommend.
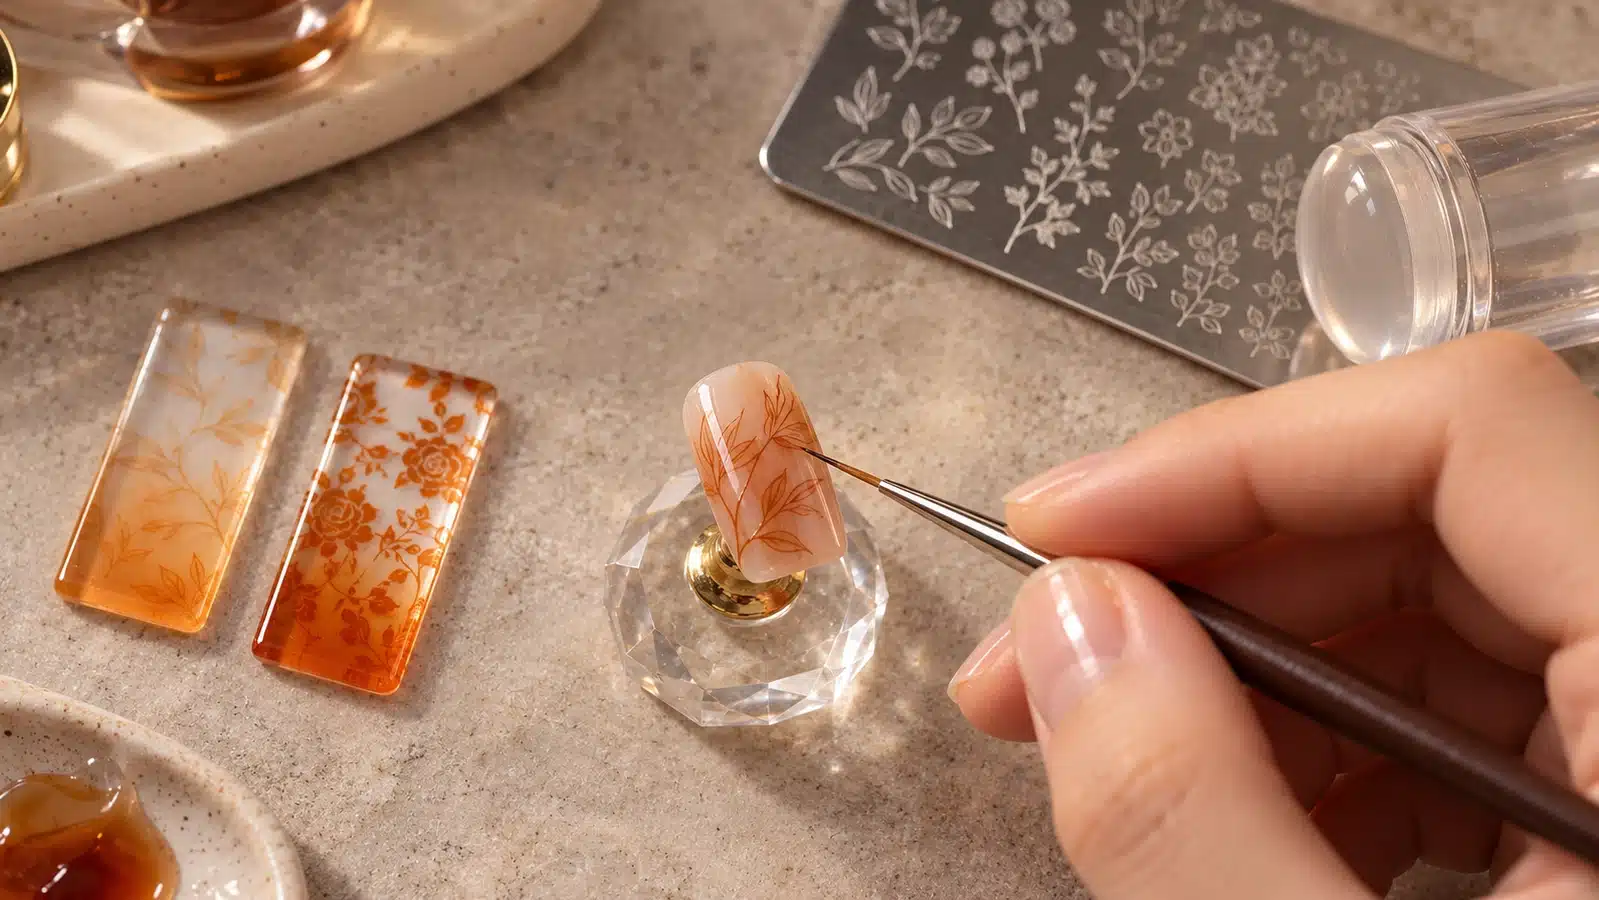
Fine brown leaf lines sit over a translucent nude base, with amber floral samples and stamping tools nearby.
8. Add Chrome Accents and Plan Curing and Finishing
Fall Winter Pat Pat Gel supports chrome powder base work and requires UV lamp curing. Its no-wipe finish leaves no tacky surface residue to remove after curing. Base and top coat requirements depend on the products and finished design being used.
Choose Where Chrome Adds Value
A metallic detail can give the same seasonal color direction a more decorative finish. A narrow accent keeps the focus on the gel color, while a larger chrome area makes the reflective surface a stronger part of the design. Choose the version that fits the looks your salon customers want to offer.
For a sales demonstration, show the complete look alongside the powder and finishing products used to create it. This makes the extra materials and application steps visible to the buyer. Evaluate the selected combination as a finished design, using the UV curing and finishing instructions for the products involved.
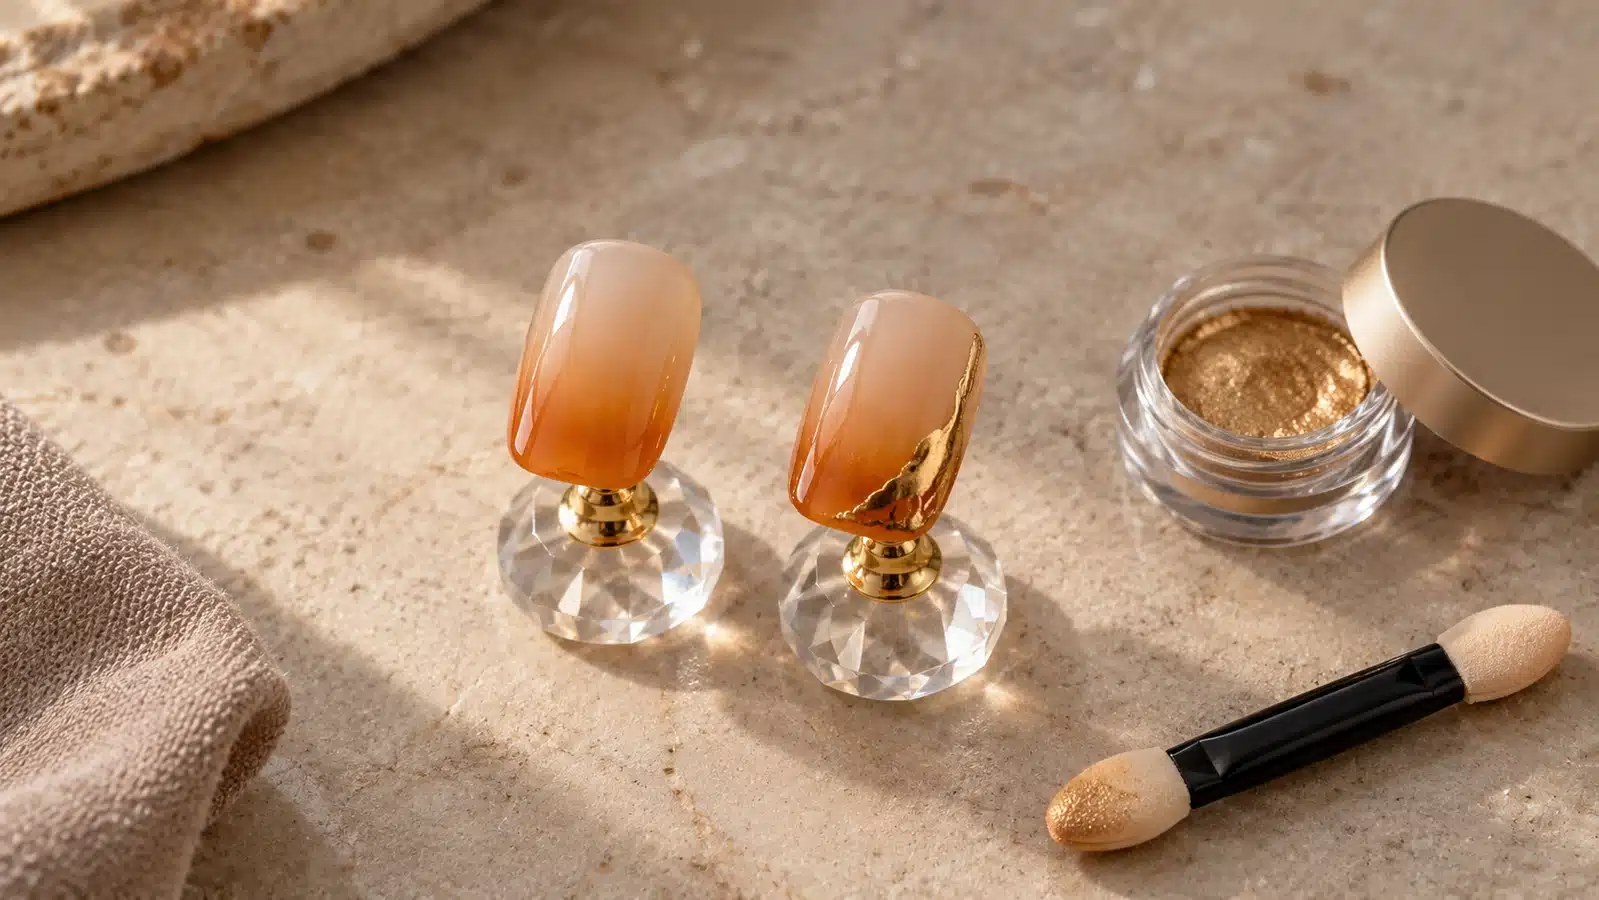
A plain amber gradient and a matching nail with an irregular gold accent sit beside powder tools.
9. Troubleshoot Uneven Color, Harsh Edges and Incomplete Transfers
When a sample misses the intended result, identify the visible issue and the stage where it appears. Change one condition at a time while keeping the shade, base and other materials consistent. The comparisons below can help a technician narrow down the cause.
Scroll horizontally if needed to view all columns.
| Visible Problem | Check First | Next Comparison |
|---|---|---|
| A heavy patch of color | Pickup amount and first contact position | Repeat with less gel while keeping the placement unchanged |
| A harsh gradient edge | Pressure and space allowed for the transition | Compare lighter contact across the same planned fade area |
| Sponge marks or unwanted mixed color | Sponge face condition and color carryover | Use a clean contact area before changing the gel amount |
| Raised or crowded painted lines | Brush loading and overlapping strokes | Reduce the brush load on the same simple line exercise |
| Gaps in a stamped pattern | Whether the gap appears during pickup or transfer | Repeat that stage with the same materials and one adjusted movement |
| An inconsistent chrome effect | Base color, powder, finishing sequence and instructions | Repeat the recorded combination before changing a paired product |
Use sample tips for these comparisons and retain both the unsatisfactory result and the next attempt. A photograph of the tool or transfer stage can explain more than a photograph of the completed nail alone.
If the issue persists, send JTING the shade number, materials, method and relevant photographs. Keep curing conditions aligned with the product instructions while investigating color placement or transfer issues. The information collected helps your technical or sales contact respond to the specific problem.
10. Build Seasonal Sets for Different Salon Services
A salon supplier can make the palette easier to understand by presenting complete design choices with different application demands. Build the menu around what technicians can reproduce, then measure the work involved before assigning service prices or appointment times.
A Neutral or Caramel Gradient Set
For a gradient gel manicure, begin with a coherent color direction and a controlled fade. Keep the initial design focused on color placement so the team can judge the transition without additional pattern work. This provides a useful starting reference for customers interested in softer seasonal nails.
A Set with a Defined Pattern Accent
Add a leaf-inspired detail, contrasting line or repeated pattern to selected nails. Specify whether the approved sample uses hand painting or stamping, and show how much of the design carries the accent. Count the actual preparation and correction work when comparing it with the gradient-only option.
A Berry or Metallic Combination
Use the pink and berry direction for a different color balance, or introduce an approved chrome accent. Where powder is involved, include the complete finishing sequence in the demonstration and timing. The additional material should serve a visible design purpose.
Warm amber designs and pink-to-berry designs can appear in separate stages of your seasonal content plan while drawing from the same palette. Choose the order around customer interest and your own selling calendar. Keep the sample sets, color numbers and demonstrated methods aligned so each new photograph leads to a design the salon can actually select and practice.
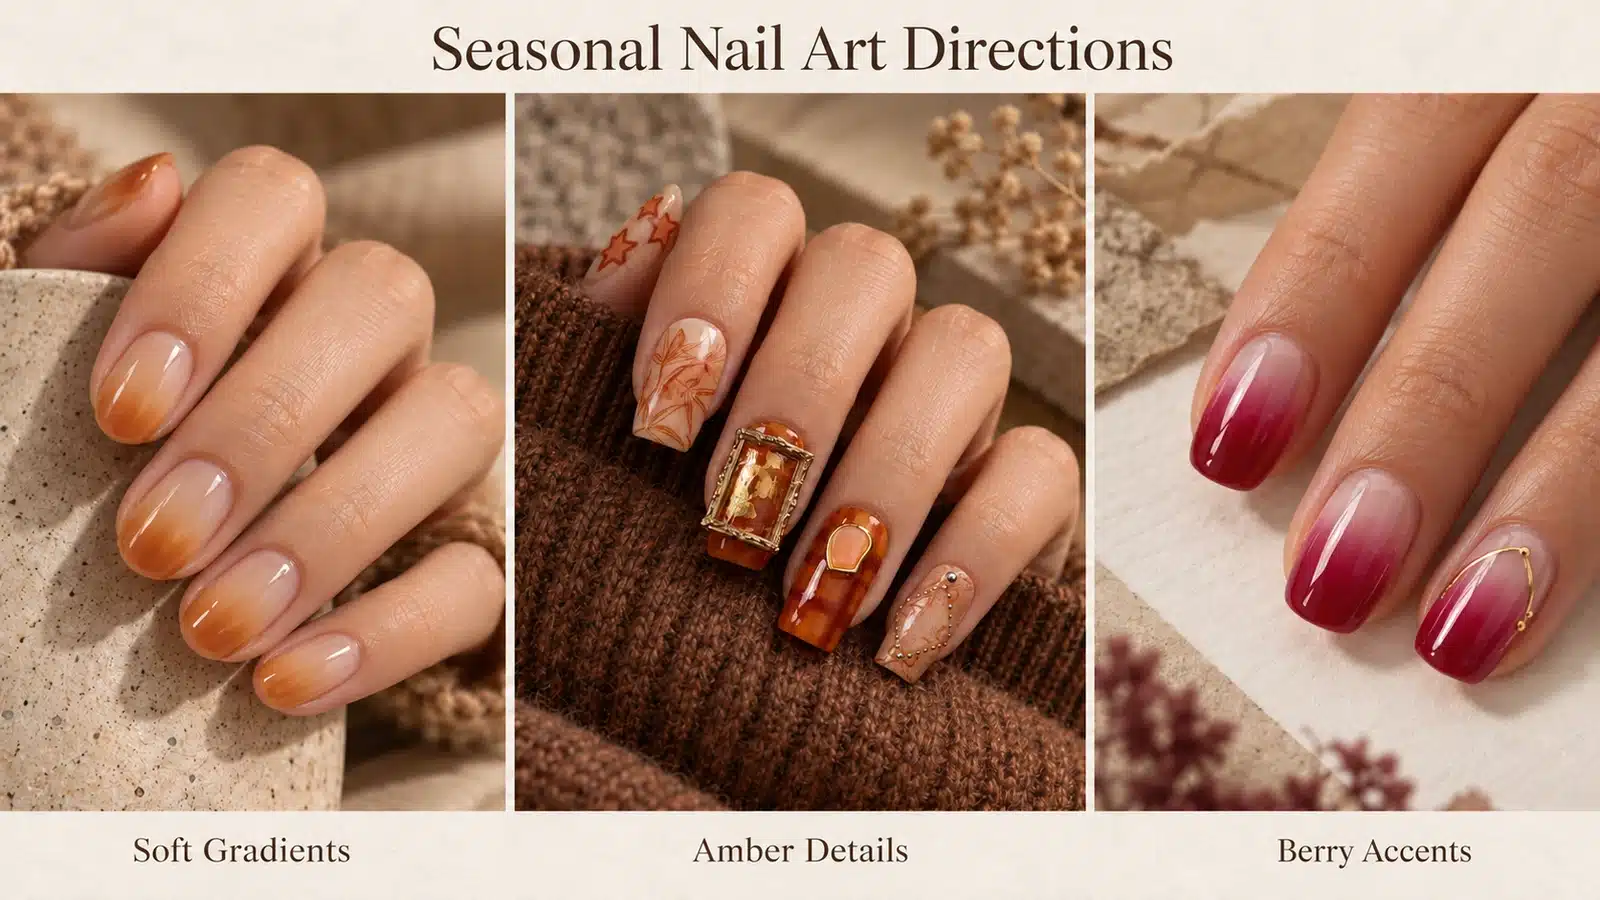
Explore soft gradients, amber details and berry accents for different seasonal services.
11. Evaluate the Palette before a Bulk Order
Sample approval should answer three buying questions: does the palette add useful designs to your range, can your team demonstrate the intended applications, and what extra materials or instruction will customers need? Check all 12 numbered shades, then select designs that represent the applications you plan to promote.
Use the same base, tools and target design when comparing samples. The record below keeps the conditions clear and gives purchasing and sales a shared reference for the selected applications.
Scroll horizontally if needed to view all columns.
| Record | What to Keep with the Sample |
|---|---|
| Shade and design | Shade number, intended effect, base color and a photograph of the target. |
| Application | Operator, sponge or brush used, pickup method, placement and any changes made. |
| Curing and finishing | Lamp identification, confirmed curing conditions, base and top coat, plus any powder or decoration used. |
| Result and decision | Coverage, edge softness, pattern completeness, finish, time taken and whether another comparison is needed. |
Keep physical samples with their shade numbers and application notes. For chrome designs, identify the powder and finishing products used so the demonstration can be repeated with the same materials.
Finish the review with a decision for each application: include it in the launch, prepare further demonstration material, or leave it for a later introduction. Ask the technicians who will present the product to reproduce the selected designs before using them in customer demonstrations.
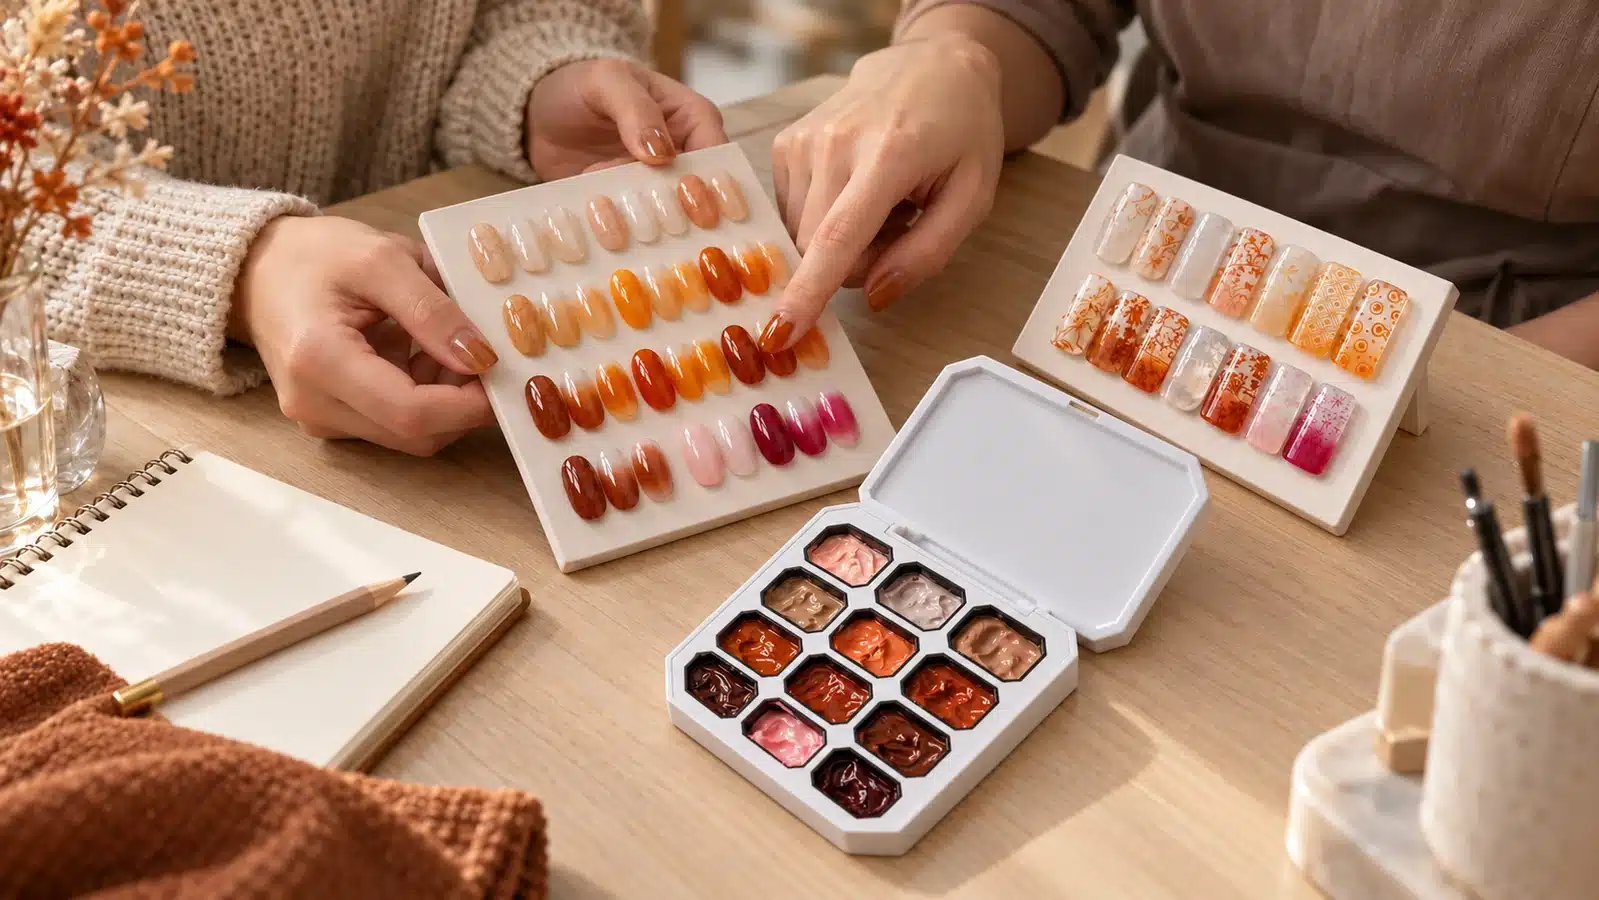
Compare finished designs and the methods used to reproduce them when selecting applications for your launch.
12. Estimate Application Time, Material Use and Cost
For salon owners, application cost helps compare the services they can offer. For brands and distributors, it helps explain why a simple gradient and a detailed stamped or chrome set need different amounts of time, materials and preparation. Each pan contains 3 g; assess usage against the chosen design and the number of nails receiving it.
Measure a Finished Service
Define the design first: how many nails receive the effect, which shades are used and which details are included. Time preparation, color application, detailing, curing and finishing separately. Record training and practice separately. Include routine corrections and rework in the time and material use of the service being measured.
- Track the gel used, including material left on the sponge or mixing surface.
- Add sponges, cleaning supplies, base and top coats, powders and other materials actually used.
- For salon costing, apply the salon's labor rate to the measured service time.
- Record training materials and staff practice as a separate launch expense.
If weighing consumption, use equipment precise enough for the small change being measured and keep the weighing conditions consistent. Otherwise, record usage over several repetitions and mark the estimate as provisional.
Compare a simpler design with the same look after adding detail. This shows salon buyers which steps and materials change when they add a pattern or metallic accent, and helps suppliers explain the service options. Keep this calculation separate from the cost of purchasing and reselling complete palettes.
13. Assess Resale Costs and Pricing for Your Sales Channel
When evaluating a wholesale pat pat gel palette, build the calculation around selling complete palettes. Separate the cost of acquiring and delivering the stock from the work required to introduce it to customers. Begin with the actual quotation and mark what it already includes.
Scroll horizontally if needed to view all columns.
| Cost Item | Check in the Quote | How It Occurs | Who Confirms It |
|---|---|---|---|
| Product, labels and selected packaging | Identify included options and separately priced changes. | Per palette or order, as quoted. | Your buyer and JTING. |
| Transport and destination charges | Check the delivery scope and excluded charges. | Usually assessed for the shipment, then allocated. | Your logistics contact and relevant service providers. |
| Sales and payment fees | Keep channel charges separate from the supplier price. | Per transaction, percentage or account fee. | Your channel or payment provider. |
| Demonstrations and content | Check which product materials are supplied and which you will commission. | Launch or campaign expense; demonstration palettes use stock. | Your sales and marketing team. |
| Customer support and order handling | Use your own expected workload and fulfillment arrangement. | Per order or period. | Your operations team. |
Use expected sales revenue after discounts and account for refunds consistently. Count each expense once, including packaging and freight already included in the quotation.
Set aside the palettes needed for demonstrations, photography and practice, then estimate the quantity available for sale. Keep both the initial cash requirement and the costs allocated to expected sales visible. A web store may need product photography and payment fees; a salon supply route may need demonstration stock and time with technicians. Use the costs of your own channel when assessing the proposed selling price.
14. Plan Palette Use When Shades Run Out at Different Rates
A salon buys a complete palette but consumes its colors individually. A shade used across several nails may run down faster than one used only for a fine line. Start a simple usage log with the shade number, design, frequency of use and observed remaining level.
Review that log against the designs your customers actually request. A nearly empty compartment matters more when it is essential to a regularly booked design than when it appears in an occasional accent. Remaining gel in other compartments does not automatically replace that shade.
- Identify which approved designs depend on the lowest remaining colors.
- Check whether you have an accepted alternative design using the remaining shades.
- Compare expected use before the next delivery with the stock already on hand.
- Set the next complete-palette order using that demand and the confirmed delivery schedule.
For distributors and wholesale buyers, keep downstream usage feedback separate from sales of unopened palettes. Salon feedback explains color consumption; your order history shows demand for the complete product. Together they help you avoid replenishing only by calendar month or by the number of partially used palettes.
If individual-shade refills or a different color configuration would change your buying plan, ask JTING about availability and order terms. Base the replenishment plan on complete palettes until an alternative supply arrangement is agreed.
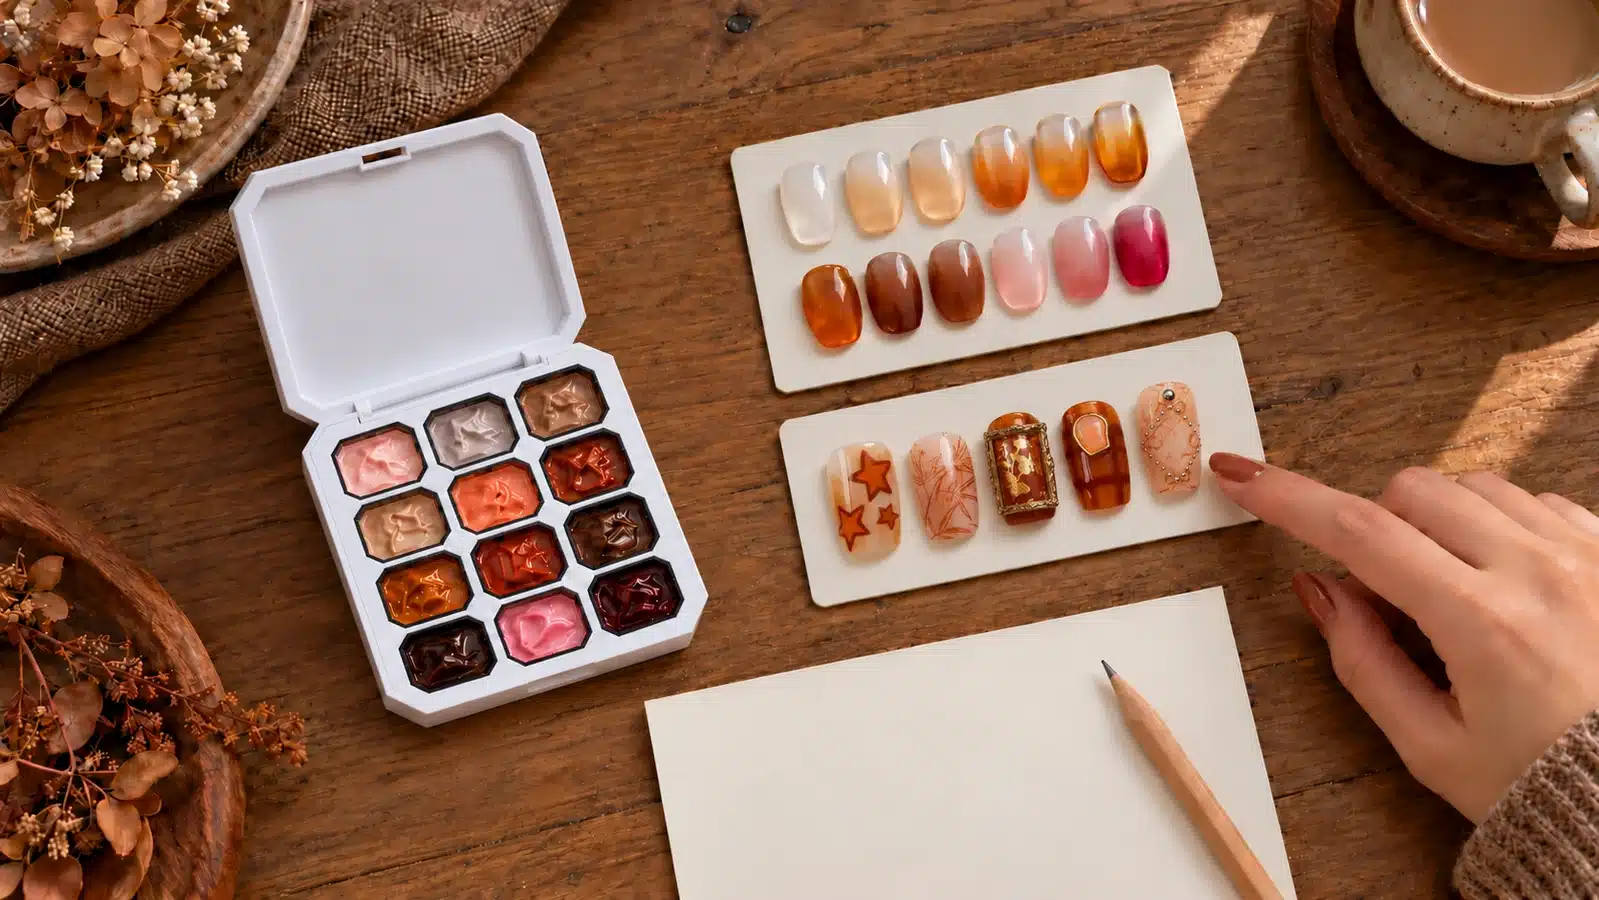
Warm gradients and detailed autumn nail art are arranged beside a 12-color Pat Pat Gel palette.
15. Prepare Consistent Demonstrations and Branded Product Materials
Use One Reference across Technicians
Turn the approved designs into a short demonstration sequence: show the shade, pickup, first placement, edge development and finished result. Use close views of the steps that most affect the appearance. The same sequence can support a salon visit, a product video or a demonstration by your sales team.
Show Exactly What Customers Receive
Build the product listing around a clear view of the palette, a numbered shade chart and selected finished designs. State 12 colors, 3 g per pan and no included tools. Identify the extra materials used in each featured look so customers can connect the image with the products they need.
Match Branded Packaging to the Product
For a private label pat pat gel project, carry the product name, shade references and agreed use information consistently across the palette label, outer packaging and sales materials. Existing label designs can be adapted with your brand information; further design or packaging changes can be discussed for the project.
JTING supports logo and label adjustments, packaging, color charts, product photography and product videos. Choose the materials your channel will use: a numbered chart for salon selection, close-up application footage for demonstrations or product photography for listings. Confirm the artwork, packaging configuration, selected visuals and their pricing together.
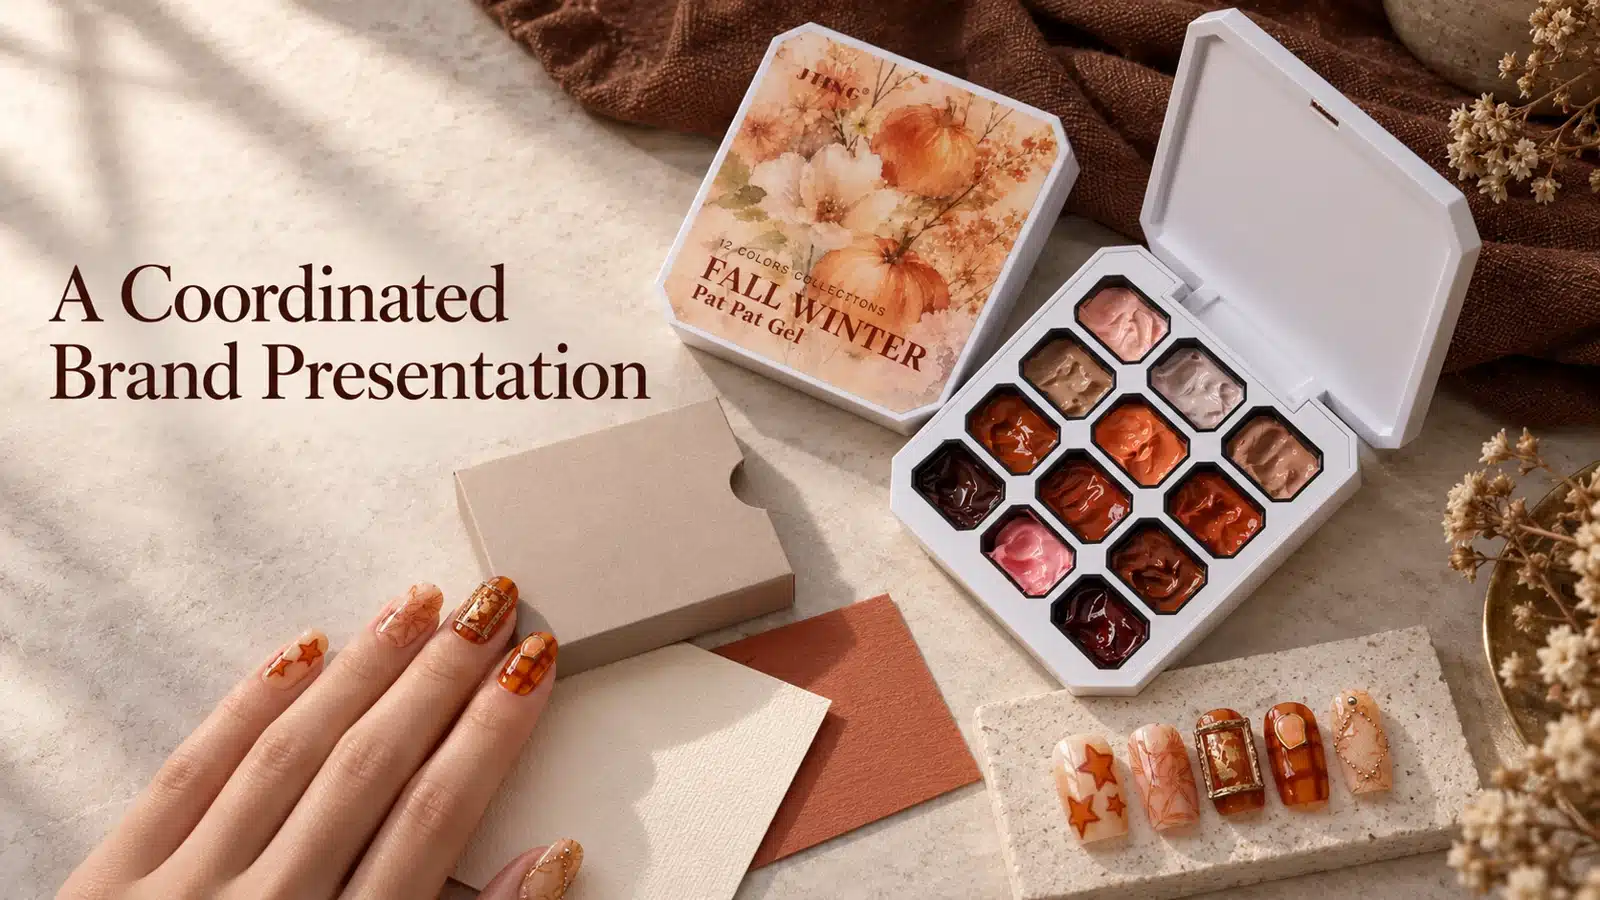
Label papers and the paper sleeve show a packaging concept. Final packaging and supplied materials are confirmed for each order.
16. Compare Quotations and Plan Your Seasonal Launch
Start with the date stock needs to be ready for your customers. Work backward through incoming checks, transport, production, packaging approval and sample review. Keep each stage visible so that a production estimate is not mistaken for an arrival date.
Request quotations for the same complete-palette quantity and specification. State whether you want JTING branding or private label, which label and packaging options you need, what sales materials you require, the destination market and the delivery scope. Confirm that the quoted unit means a complete G78 palette.
JTING's usual planning windows are 7–10 business days for standard samples and 15–20 days for bulk production after sample and packaging approval. Your quotation should state the minimum order in complete palettes and the schedule for the selected branding and packaging. Allow separately for revisions, transport and incoming checks when setting the launch date.
Share the product information and document requirements of your destination market or sales channel with JTING. Confirm the available support for the palette and keep the product name, model, specification and label version consistent with the order.
For repeat orders, refer to the approved sample and packaging version and identify any requested changes. Confirm current pricing and timing for each order, including when the product configuration stays the same.
17. Check Incoming Palettes and Handle Customer Feedback
Match Deliveries to the Approved Reference
On arrival, compare the delivered quantity, product name, G78 model, 12-shade numbering and packaging with the order and approved reference. Check the label version and photograph any visible damage or mismatch. Keep the order reference and any batch information available on the delivered goods.
For an appearance or application comparison, use the same lighting, base color, tools and method as the approved sample. Keep any item needing clarification with its packaging and photographs, so the difference can be reviewed against the order.
Collect the Details Needed to Review a Problem
Separate an issue noticed when opening the palette from one noticed during application or after the design was finished. Ask for the shade number, the stage at which the issue appeared, the supporting materials, lamp details and application conditions. Include clear photographs or a short video showing the relevant area.
Keep the customer's account in their own words and add the order reference before forwarding it to JTING. Include the affected sample or packaging where available. Your team can then follow up on the same reported issue, with the relevant product and application information in one place.
18. Questions Buyers Ask about Fall Winter Pat Pat Gel
How Many Colors Are in the Palette?
It contains 12 colors, numbered No.01–No.12, with 3 g per pan. Full-color, gradient and patterned samples show different effects from the same shades; they do not represent additional colors.
Which Tools Do I Need, and Are They Included?
No tools are included. Prepare the tools for your chosen technique, such as a sponge, detail brush or stamping supplies, along with the required base, finishing materials and confirmed UV curing setup.
Can I Use It for Nail Stamping and Chrome Powder Effects?
The gel can be used for nail stamping and as a base for chrome powder effects. Evaluate the selected plate, stamper, powder and finishing combination before including that design in your customer demonstration.
Does No-Wipe Mean I Can Skip the Top Coat?
No-wipe means there is no tacky surface residue to wipe away after curing. Follow the base and top coat requirements for the products and finished design you are using.
Can I Reorder Individual Shades or Change the Palette Colors?
Ask JTING about availability and order terms for the shades or configuration you need. The quotation will confirm whether the order covers complete palettes or a separately agreed alternative.
Can the Label and Packaging Be Customized?
JTING supports logo, label and packaging adjustments. Share your brand artwork and packaging requirements, then confirm the selected design, sample, order quantity and quotation.
What Are the MOQ and Lead Time?
Ask for the price per complete palette, the minimum order for your selected branding and packaging, and the expected sample and production schedule. Confirm transport timing separately against your required arrival date.
Which Product Documents Can JTING Provide?
JTING can support product documentation such as SDS and INCI information, depending on the product and destination market. Share the requirements of your importer or sales channel to confirm which files are available for this palette and the ordered specification.
19. Request Fall Winter Pat Pat Gel Samples and a Wholesale Quote
Contact JTING to discuss Fall Winter Pat Pat Gel samples and a wholesale quotation. Share the nail art applications you want to offer, your expected palette quantity, destination market, target arrival date and branding or packaging needs with JTING.
If you already have a seasonal range, include the designs or color gaps you want this palette to address. These details help define the samples to review, the product presentation and the delivery requirements for your order.